
How to Display Wall Art for Stunning Personalized Decor
Over half of american homeowners believe that adding personal touches to their walls boosts emotional connection to their space. Personalized wall art does more than fill a blank wall. It brings your stories and memories out in the open, creating a warm atmosphere that truly feels like yours. This guide shows you how to choose, arrange, and showcase pieces that highlight your unique journey, making every room feel inviting and meaningful.
Table of Contents
- Step 1: Select Personalized Wall Art That Tells Your Story
- Step 2: Prepare Your Space and Gather Hanging Supplies
- Step 3: Arrange Artwork Layouts for Balance and Impact
- Step 4: Hang Art Securely and Adjust Placement
- Step 5: Verify Leveling and Enjoy Your Finished Display
Quick Summary
| Important Insight | Explanation |
|---|---|
| 1. Choose Art That Reflects Your Story | Select wall art that captures meaningful memories; it personalizes and defines your living space. |
| 2. Prepare Hanging Supplies Carefully | Gather essential tools like a tape measure, level, and appropriate wall anchors before installation to ensure a smooth process. |
| 3. Plan an Effective Artwork Layout | Experiment with different configurations on the floor to create a balanced and visually appealing display before hanging. |
| 4. Ensure Secure and Accurate Hanging | Use the correct hardware, mark placement precisely, and hang art at eye level for optimal aesthetics and safety. |
| 5. Verify Alignment for a Polished Look | Double-check leveling after hanging to ensure a neat display and enjoy the beauty of your personalized wall art. |
Step 1: Select Personalized Wall Art That Tells Your Story
Choosing wall art that captures your personal narrative transforms a house into a home. According to archeworks, personalized wall art allows you to infuse your personality and memories into your home decor, adding a unique and heartfelt touch that makes your space truly yours.
Start by reflecting on the stories and moments most meaningful to you. Your wall art could showcase family milestones like wedding photos, childhood artwork, travel memories, or cherished portraits. As learncalifornia suggests, creating a designated gallery area helps celebrate your loved ones and their creativity. Consider mixing different mediums like canvas prints, metal signs, or framed memories to create visual depth and interest.
When selecting pieces, think about color schemes that complement your existing decor and choose art that sparks joy when you look at it. Your wall art should feel personal a true reflection of your journey and the people who matter most. Pro tip look for customizable options that let you add names, dates or special messages to make the artwork even more meaningful.
Step 2: Prepare Your Space and Gather Hanging Supplies
Before hanging your personalized wall art, careful preparation is key. According to files, proper preparation of your space and gathering necessary hanging supplies are essential steps in displaying wall art effectively. This means selecting the right tools and ensuring your wall surface is ready for installation.
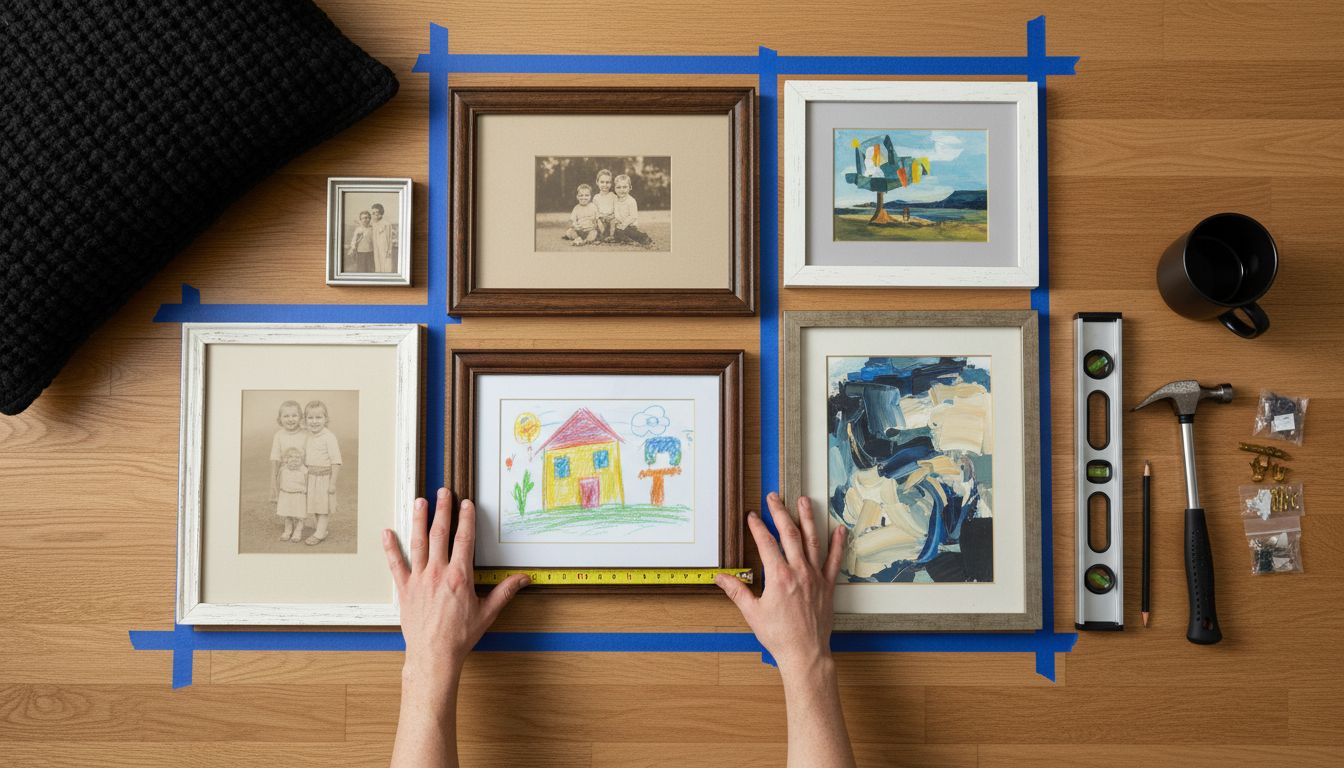
Start by collecting your essential hanging supplies: a tape measure, pencil, level, hammer, wall anchors, screws, and appropriate hanging hardware for your specific wall type. Take time to measure and mark your desired placement carefully. If you are hanging multiple pieces, use painter tape to create a visual layout on the wall first. This helps you visualize the final arrangement and make precise measurements before making any holes.
Pro tip look for wall anchors that match your wall material some work better on drywall while others are designed for plaster or brick. For delicate or heavy pieces, consider consulting a professional to ensure secure installation. How to Hang Wall Decor: Stylishly Personalize Your Home can provide additional guidance on creating the perfect wall display that showcases your personal style and cherished memories.
Step 3: Arrange Artwork Layouts for Balance and Impact
Creating a visually compelling wall art display requires strategic planning and thoughtful arrangement. According to files, the simplest grouping starts with three works, but more complex arrangements can involve five, seven, or nine pieces to create visual interest.
Begin by laying out your artwork on the floor to experiment with different configurations. Consider the visual weight of each piece its size, color, and frame style. A balanced layout typically follows the principle of visual symmetry or intentional asymmetry. Try creating a central anchor piece surrounded by smaller works, or align pieces along an imaginary horizontal or vertical line.
Pro tip for larger collections use the double hanging technique recommended by design experts. Balance a single artwork on one end of your grouping with a double hanging on the other to add dynamic visual interest. How to Arrange Wall Art for Personalized Home Decor can provide additional insights into creating a personalized gallery wall that truly reflects your unique style and memories.
Step 4: Hang Art Securely and Adjust Placement
Securing your personalized wall art requires precision and care. According to files, proper hanging techniques are crucial to ensure artwork is displayed securely and at the correct height, which involves using appropriate hardware and measuring accurately to achieve the desired placement.
Start by marking the exact hanging point with a pencil, using a level to ensure straightness. Select hardware that matches your wall type and the artwork weight wall anchors for drywall, toggle bolts for plaster, or specialized hooks for heavier pieces. Carefully drill pilot holes and insert anchors before hanging.
INFOGRAPHIC:infographic_content] As [mailpro suggests, each piece should tell a part of your story, making your display not just decorative but a meaningful conversation starter.
Pro tip always hang artwork at eye level approximately 57 to 60 inches from the floor for optimal viewing. For multiple pieces, maintain consistent spacing between frames to create a cohesive look. How to Hang Canvas Art: A Step-by-Step Guide can provide additional insights into perfecting your wall art installation technique and ensuring your cherished memories are displayed beautifully and securely.
Step 5: Verify Leveling and Enjoy Your Finished Display
The final stage of your wall art journey is ensuring precision and celebrating your personal design achievement. According to files, verifying that artwork is level and properly aligned is the crucial final step in creating a polished display, with this attention to detail enhancing the overall aesthetic and ensuring a visually pleasing arrangement.
Use a spirit level or laser level to double check each piece’s alignment, making minor adjustments as needed. Step back and view your display from different angles to confirm everything looks perfectly positioned. As mailpro suggests, balance the aesthetics while maintaining the personal value of each piece, ensuring your display complements your overall decor while retaining its meaningful significance.
Pro tip take a photo of your completed wall art display. This allows you to see your arrangement from a different perspective and helps you make any final subtle adjustments. Stepping back and appreciating your personalized artwork is the most rewarding part of this creative process. Creating a Gallery Wall: Step-by-Step Guide for Personal Touch can provide additional inspiration for future wall art projects and help you continue refining your personal decor style.
Elevate Your Home with Personalized Wall Art That Truly Speaks to You
Struggling to find the perfect way to showcase your memories and personality on your walls Explore our Personalized Canvas Wall Art Prints designed to transform any space into a heartfelt gallery. With options to add names dates and personal messages you can create stunning displays that bring balance impact and meaning to your home decor.

Start crafting your unique story today at FunLifeNow. Don’t wait to turn empty walls into a celebration of your journey and special moments. Shop now and enjoy expert craftsmanship combined with thoughtful customization that makes every piece a lasting treasure. Check out our collections and experience how easy it is to hang art that is both beautiful and meaningful.
Frequently Asked Questions
How do I choose wall art that reflects my personal story?
Selecting wall art begins with reflecting on significant moments and memories in your life, such as family events or travel experiences. Consider incorporating various styles and mediums that bring joy to your space, and aim for customization by adding personal elements like names or dates.
What supplies do I need to prepare for hanging wall art?
To hang wall art securely, gather essential supplies such as a tape measure, pencil, level, hammer, wall anchors, screws, and appropriate hanging hardware. Measure your wall space carefully and mark where you want the art to go before drilling any holes; this minimizes mistakes and ensures a polished look.
How can I create a balanced layout for my wall art?
To achieve a balanced layout, start by arranging your artwork on the floor to test different configurations before committing to the wall. Aim for visual symmetry or intentional asymmetry by pairing smaller pieces with a central anchor piece, and keep spacing consistent between frames for a cohesive appearance.
What are the best practices for securely hanging wall art?
Hang wall art securely by marking the correct height with a pencil and ensuring it is level before making permanent adjustments. Use appropriate hardware depending on your wall type, such as wall anchors for drywall or toggle bolts for plaster; this ensures your artwork stays securely in place.
How can I ensure my wall art display is visually appealing?
Verify that each piece is level and aligned properly to enhance the overall aesthetic of your display. Step back and view your arrangement from different angles, making minor adjustments as needed to achieve a polished and visually pleasing arrangement.
What should I do after completing my wall art display?
After finishing your wall art display, take a photo to evaluate the arrangement from a different perspective. This allows for any final tweaks, ensuring that your display reflects your style and personal significance beautifully.